Thursday 4 August 2016

Top 10 Myths About Hiring a Virtual Assistant

10 common myths about hiring a virtual assistant by Alyssa.


1. It’s expensive – I can’t afford a virtual assistant. Hiring help does not have to be expensive. Yes, you can find VAs who charge $50 or more per hour, but this is typically for detailed projects needing more skills and experience. At the other end of the spectrum, you can hire workers overseas for around $2.50/hour. The nice thing about contracting with a VA is that you know the costs upfront – you don’t have any additional expenses beyond their hourly rate of pay.

2. You have to hire someone full time. You can hire a VA for as little as a 1 hour project or full time every week of the year – it is up to you and the needs of your business. Most VAs can work on a per-project or hourly basis and understand that you may not need them a set number of hours each week from the beginning. Start with a simple one time project or just a few hours per week if you’re just dipping your toes into outsourcing. You can increase the hours and number of projects you hand over to your VA as you become more comfortable.

3. You have to offer benefits. In reality, a VA is an independent contractor, responsible for his/her own insurance, taxes, retirement, etc. You are not obligated to offer any benefits to your VA, unless you’d like to, of course.

4. My virtual assistant needs to work in my office/workshop alongside me. VAs are, by nature, virtual. This means they don’t show up every day at 8 am ready to work in your office. They may work from their own home, a coffee shop, or from a beach in Bali – wherever they can get internet access. The beauty of cloud technology is that information can be shared and projects completed even if team members are thousands of miles and multiple time zones apart.

5. I’m a solopreneur – my business is too small to justify hiring a virtual assistant. Businesses of any size can benefit from hiring help, even at just a few hours per week. You don’t have to be (or have the hiring budget of) a major corporate giant to hire an assistant.

6. A virtual assistant will take more time away from my work, since I have to supervise him/her all the time. In the beginning, you will need to make the time to be available to your VA to train him/her in how your business operates, and how to compete the tasks you’re delegating. But a quality VA can quickly pick up on your teachings and require very little hand holding or supervision. You’ll need to regularly communicate with your VA, but if you’ve hired a quality worker, you won’t need to constantly be checking in with him/her or worrying that your tasks aren’t getting done.

7. The help I need (fill in the blank) is too advanced for a virtual assistant. Virtual assistants often get pigeon holed, with potential clients thinking they can ‘only’ complete simple, mundane tasks. This is far from the truth. I’ve worked with some VAs who are extremely skilled in coding, accounting, design work, research and writing, event planning and social media management.

8. I’m horrible at delegating, so hiring a virtual assistant wold be pointless. This is exactly why you need a VA. Practice delegation by handing off small tasks to start with. This will strengthen your delegation skills while demonstrating how much easier your business and life can be by getting some tasks off of your plate. Start slowly, and I’m sure that you’ll soon be delegating more and more work to your VA!

9. I can’t trust a virtual assistant with the confidential information in my business. Just as you wouldn’t hand the password to your bank account to a brand new employee on their first day, you want to establish trust with your VA before sharing confidential information. Ask a potential VA for references from other clients where they’ve had to deal with confidential information. Then ask the other client how the VA has handled that responsibility. You can also require your VA to sign a Non-Disclosure Agreement and contract as another layer of protection. Most VAs can also get bonded. As with anyone, use your best judgement, go slow and build trust before allowing access to confidential information in your business.

10. A virtual assistant can’t really help with my handcrafted business. This is one of the biggest misconceptions – a virtual assistant can help with ANY type of business, and many VAs can assist with personal tasks as well. In fact, I’ve created ashort report with 108 personal and business tasks you can outsource. It can really open your eyes to the possibilities of working with a VA and how much help you can receive while still retaining the handmade aspect of your business.

What Makes A Great Social Media Post?


7 - Day Smart Phone Detox


Social Media Explained with Coffee


Tuesday 2 August 2016

Calendar Management: Getting Control of Your Appointments and Meetings:

One essential element of any time management focus is getting control of your calendar. In my work, I am constantly balancing the multiple pressures of working with others, getting important items completed, handling a never-ending stream of urgent items, and working in solitude. Rather than letting the ‘tyranny of the urgent’ dictate each day, I get more control over each day by explicitly reserving time for important items, allowing flexible time to handle urgent items, and giving thoughtful consideration to how I should allocate my time amongst the many contending demands. This article contains tips that work for me (most of the time) in managing my calendar.


Actively Managing Your Calendar - Clear the Clutter & Focus on the Important

Some of my colleagues don’t need to actively manage their calendar – they find sufficient time in the day to get their own work done and are able to schedule, with relative ease, collaboration work sessions with others. If this describes you, then you can probably save 10 minutes and skip the rest of this article. However, if you find it a struggle to get your own work done, schedule time with others, or respond to the requests from others to meet with you then this article may have tip or two on calendar management that might be useful.

I'm not an advocate of being a slave to the calendar. Rather, I am a proponent of exercising control over my calendar to accomplish my goals and ensure that I am working on those items that are “most important now.” This control is primarily in the decisions I make on those items that I permit onto my calendar and the amount of time I allow for each of those items. In essence, I allocate time to my priorities, which are a composite of “the important” and “the urgent.”

I recognize that more time in my work day will never let me get to everything; prior to adopting an aggressive set of calendar management techniques, I found that even working as much as 70 hours a week still found me on Friday afternoon with an overflowing inbox, many important meetings missed, and my own work tasks incomplete. I've developed and constantly apply various filters to those items that are demanding my time; thus I’m not only deciding those items that will get some portion of my time, but also those items that get reduced amounts of time, or perhaps even none of my time. These are tough decisions to make, but in making those decisions I am able to focus more on the task at hand, and worry less about those other demands on my time that I just cannot (and don’t really need to) accommodate.

Quick Diagnosis – Are You Managing Your Calendar Adequately?

Take a glance at how well you are managing your calendar. Do any of these describe a typical experience people have when working with you?
  1. You complain to colleagues that your time is double- and triple-booked or that you are constantly in back-to-back meetings – as a result, you are unable to participate and contribute as expected. 
  2. A person needing to meet with you finds that your next available free slot is way off in the distant future.
  3. You initiate a meeting invitation without any clear agenda or necessary preparation identified.
  4. You accept a meeting invitation, but don’t attend the meeting.
  5. You decline a meeting just because your calendar shows that you are occupied at that time. Basically, “first come, first served” (i.e., the first meeting proposed for a given time slot is the one that will be conducted at that time) is your approach to accepting meetings.
  6. You respond to an invitation (involving many attendees) with a decline, but with no counter-proposal or other helpful information back to the originator.
  7. You don’t respond to a meeting invitation that has come to you; you aren’t able to make a definitive statement (even to yourself) on whether you will attend.
  8. You arrive late to a meeting, explaining that your prior meeting over-ran.
If you’ve found even one of these statements to be an accurate description of your situation, then there’s a chance that the use of some calendar management techniques can be helpful. If most these behaviors describe you, then you are probably having an adverse impact on the effectiveness of others, as well is on yourself – for you, improvements in controlling your calendar can be of benefit not only to you and but to your colleagues as well.

Tips for Managing Your Calendar

Much as we’d like to think so, being overbooked and persistently unavailable is not a badge of honor. To the contrary, it is a call for some first-aid on calendar and workload management.

These tips are oriented towards project managers and individuals who manage a group (or multiple groups) of people. You probably find yourself frequently proposing meetings with team members – these are typically collaboration sessions that bring project members together to work through project work items or review progress. As well, you probably have categories of meetings (e.g., quarterly executive status review, annual feedback to group members) that can be planned long in advance.

Deciding What Should be on Your calendar - Only “Most Important Now” Remain on Your Calendar

If you don’t schedule time for your most important items, your risk having these displaced by urgent items.

1. Reserve time on your calendar for your important items – many of these can be planned and scheduled months in advance. Think about the next few months and how you want to be spending your time. Here are some items that I put onto my calendar because they are important to me:
  • One-on-one meetings with my direct reports and other key people in my organization. I know with absolute certainty that I need and want to allocate time to this activity. By putting these meetings onto my calendar (generally many months in advance) I make it more likely that these important activities will take place.
  • Vacation time. Getting this onto my calendar prevents me from scheduling other activities during this period. I also put an ‘On Vacation’ event onto the calendar of people in the organization who need to know of my planned absence – the event information is for the duration of my planned absence and indicates my delegation of responsibility, emergency contact information and rules for engagement during my absence (sometimes I welcome calls and may be checking email; in other instances I wish to be undisturbed).
  • Solitude. This is my think time, away from the hectic activities of each day.
  • Training. Nearly everyone I meet tells me they have no time for training. My approach is to reserve training time onto my calendar.

2. Review your calendar at start of each week. A quick scan can help you discover meetings that don’t necessarily require your time, so take action to remove these meetings or shorten their duration. Discover any double bookings, making priority calls on which meetings to attend or rescheduling those that must be moved. Search for any incoming meeting proposals still awaiting a response from you and respond appropriately to meeting organizers.

3. Hold some open time on your calendar that is similar to a college professor’s office hours. Let people know that you will be available for ad hoc, impromptu discussions. This is particularly helpful if you are typically unavailable and difficult to reach.

Scheduling the Meeting – Getting It On Everyone’s Calendar

1. Schedule meetings in advance. Some meetings are easily foreseen, and it can help all attendees to have these meetings scheduled well in advance. Early scheduling helps everyone reserve the time, thus ensuring full attendance. Knowing the need for a meeting but delaying the meeting invitation will surely make it all the harder to get acceptances from all of the invited attendees. 
  • Here’s an example situation familiar to project managers: If you are creating a project plan you could take steps (on your very first day of working on the plan) to schedule the various information sharing sessions, planning sessions, commitment sessions, etc. Those meetings might span several weeks, and your meeting invitations would help clarify the actions and time commitments you need from project participants as you go through your planning phase.
  • For directors of organizations: If you periodically conduct an all-hands meeting, then you are asking a large population of individuals to reserve a specific date/time time on their calendar. Scheduling these sessions in advance can help. If your personal schedule is sufficiently stable such that you could schedule these meetings across the next several months without any noticeable risk of changing the date/time, then locking those dates/times into the calendars of everyone in the organization can help drive attendance up.
2. Don’t delay in scheduling a meeting. Today’s calendaring systems make it almost trivial to propose a meeting. It makes clear sense (to me, anyway) to act almost immediately once the need for a meeting has been identified and validated – in most instances, this scheduling task consumes under a minute of time.
  • If you are in a conference call and someone mentions having a follow-up meeting or other detailed working session, take the sixty seconds while on that call to get the new meeting onto everyone’s calendar. This helps everyone reserve that time for your meeting and increases the chances of getting the required attendance.
3. Check the availability of your required attendees. Within an enterprise, MS-Outlook gives you a method of checking a person’s availability. Make good use of this capability when initiating a meeting proposal for a small meeting (perhaps up to three or four participants).
  • Abandon the practice of sending an email that says ‘when can we meet’ – this just creates a valueless transaction that should be replaced by an actual meeting invitation for a time when your other participants show as ‘available.’ 
  • If a person is fully booked and thus has no availability for a meeting that is needed, here’s what I do: I proceed with a meeting proposed for a time that is convenient for me, accompanied by an explanation (in the meeting invitation) that I couldn’t find a free slot, I recognize that the person is busy and I’d like their help in identifying and counter-proposing a suitable time to meet – this almost always works and results in a scheduled meeting.
Responding to Meetings Scheduled by Others

1. Respond promptly and helpfully to a proposed meeting. Help the meeting organizer know your willingness and availability to participate in the meeting they have proposed - let your 'Yes' be 'Yes,' and your 'No,' 'No'. No fair giving a “tentative” response that means “I don’t know if I am attending;” such a response makes it all the more difficult for the meeting organizer to effectively assemble all of the participants. (Many teams have a modus operandi in which a ‘tentative’ response means “I’m not attending buy still want this meeting to appear on my calendar.”) If you cannot attend, decline the meeting along with a proposal back to the originator with a helpful approach – this might be an alternative meeting day/time or an alternate participant.

2. When resolving a schedule conflict, give thought to resolving these contending demands. You obviously can’t be in two meetings at once, but don’t automatically conclude that the first meeting to arrive on your calendar is the meeting that you should attend (which you would signal by declining, with little thought, the more recently proposed meeting). Surely the importance of the contending meetings is a consideration, but here’s another: if the first meeting is an easily rescheduled meeting (say, a 1:1 meeting) and the newcomer is a meeting with a group of people who can all attend at that time, then take these factors into account.

3. Ensure an appropriate duration. When a meeting proposal arrives to you, recognize when that proposed meeting duration is not appropriate and take the initiative to suggest a with a more suitable duration. Just about every meeting proposed to me is 30 minutes (or a multiple of 30 minutes) in duration. But there’s nothing magical about our time system that makes these proposed meeting durations correct. Consciously limit meeting duration for those topics that are less important or complex – time box the discussion. Likewise, if a proposed meeting on a complex topic is too short, then you run a risk of not completing the goals of that meeting. 

Executing the Meeting – Starting and Ending as Scheduled

1. Put valuable meeting into the meeting invitation, not in separate email messages. Make it easy for your meeting participants to locate information about and for the meeting. Follow the typically recommended practices for effective meetings: have an agenda, be clear on roles in the meeting, alert people to required preparation, and make reference information readily available.
  • Your meeting invitation should be the location for all of this valuable information: put the agenda right into the invitation and include a link to a project repository that holds reference documents needed for the meeting. 
  • Abandon the practice of sending the agenda or actual documents in a separate email – separating the meeting invitation from this other information unnecessarily introduces a chore upon the participants of coordinating various information streams; I’ve rarely encountered a meeting in which this coordination was easily accomplished, and instead it just delays the actual start of the meeting as people search for the proper email.
2. 5 minutes left on the meeting clock, but over 45 minutes of discussion remain; another meeting is needed. Recognize when your scheduled meeting duration is just not long enough. When only a few minutes remain in a scheduled meeting and there is still much material yet to cover then it is time to change your approach. Don’t try to cover all the remaining topics, it just frustrates everyone as you rush, inevitably causes the meeting time to over run (probably delaying everyone from their next meeting), still doesn’t allow you to cover all the agenda topics, and probably gives an ambiguous close to the meeting. Instead, immediately switch gears to briefly cover any extremely urgent items and then agree that a follow-on meeting is needed. Determine how urgently that meeting must be conducted and get it on to everyone’s calendar right away.

Reducing Disruptions and Checking Work Completion

Here are two calendaring ‘tricks’ I use to manage expectations:

1. Pre-empting the Urgent Request for Information on an Assigned Task. Suppose your boss asked you to get something (complicated) done. You’ve made some progress, but if your boss asks you today to give an update you won’t really have a good story to tell. Instead of waiting for that request (which might come in as an urgent request for an update, thus disrupting your day), take the initiative to schedule a meeting, for a week or two from now, for the purpose of briefing your boss – then work like crazy to get the task done so you will have a good report to give. Now if your boss asks for an update you can reply “I’ve already scheduled time on your calendar for us to go over that information.” I’ve had only a few instances where my boss said “no, let’s not wait for that meeting; please brief me today.” Of course, if members of my organization adopt this strategy, I’m wise to them and occasionally will insist on a briefing today or tomorrow.

2. Ensuring Satisfactory Completion of a Complex Task. Suppose someone is working for you on a task that is complex or important. You’ve agreed on a completion date/time. Go ahead and schedule a ‘completion review’ or ‘turnover review’ meeting for that very date and time. Having that meeting on the calendar meeting will reinforce the importance of completing as agreed, help eliminate communication errors in the turnover, and just might eliminate any need for additional ‘recovery’ meetings (which would be needed if the work item was not completed as needed).

What’s Next?

Assess your own situation. If you find that management of your calendar is lacking in some areas then assess whether you are willing to try some new techniques. Select a couple of tips from this article or invent a few on your own, and try them out for a few weeks until they become second nature. If they work for you, then share your results (and this article) with your colleagues. Good luck!

Beginner: How to Create, Manage, and Share Calendars in Outlook 2013:


Unless you’re living a life free of responsibilities, the sun probably rises and settles on your daily calendar. If you don’t know what’s going on a daily basis, you can quickly find yourself lost in a maze of missed appointments and surprise meetings.

Let’s talk about Outlook’s Calendars because outside of e-mail, (perhaps even more so at times), being organized and productive relies on the ability to manage events and get stuff done. One of the things that Outlook does with great aplomb, perhaps better than most other applications, is calendaring. Outlook’s calendar functions are second-to-none when it comes to creating, modifying, and sharing events.

This article will focus primarily on the simple stuff. We’ll show you how to create and manage your calendars, add appointments, meetings, and also share them with others in your address book for easy collaboration. By the time we’re done, we’ll show how beyond using Outlook for the basics like e-mail or contacts and address books, you can incorporate the calendar into your busy life and improve your home or small office.

Calendar Basics

Whenever you use Outlook, you’ll have its calendaring capabilities at your disposal. Even if you don’t have an email account set up, you can still use Outlook for the rest of its features. The calendar works best, however, if you can take advantage of its collaborative capabilities, so using an email account assures you’re able to send meeting invites and receive attendee notifications.

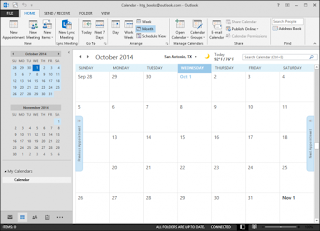
Regardless, here’s your basic, everyday calendar, i.e. the default calendar associated with your default Outlook profile. This is the monthly view, but you can use the functions on the Arrange tab to change the view.


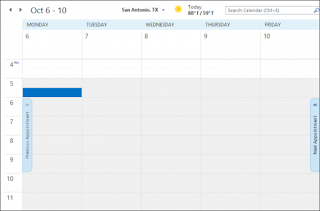
For example, below is the work week view (versus the whole week view). It’s very simple, with the weather (you can set it to your town), and a search box. If you have any meetings or appointments, you’d see them here, and you can skip to the previous or following week by clicking the “Previous Appointment” or “Next Appointment” buttons, respectively, along the calendar edges.


Let’s move on a bit and focus on how to change your calendar’s arrangement to better suit your specific or particular needs.
Flexing Your Calendar’s Muscle

You can do quite a bit to change your calendar’s arrangement and appearance. If you check out the View tab below, you see a whole assortment of styles that you can employ for a calendar that suits your organizational needs.


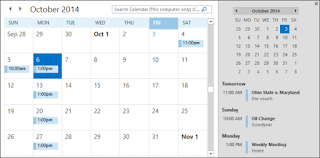
Check out the following calendar. We’ve made some minor changes to its appearance. For one, you can change the color, which is a subtle but nice touch.


The View tab lets you add several other views to accentuate the mode you’re in. For example, there’s the To-Do Bar, which lets you add calendars, people, and tasks to the right-hand column (see above). This To-Do Bar is customizable to the mode you’re in, so even if you’ve got the tasks and calendar enabled, as in the above screenshot, if you switch to your inbox, you will need to re-enable the To-Do Bar.

It’s a good idea to play around with the View tab in each mode because they’ll not all be exactly the same. For example, the Reading Pane isn’t much use in the calendar view, but it’s definitely a great addition to you inbox.


Similarly, check out a daily calendar view with the Daily Task View enabled. You can see here you daily calendar with your due tasks below.


We’ll talk a great deal more about tasks in an upcoming article, but now let’s focus on everything you might want to know about appointments and meetings.

Adding Appointments and Meetings

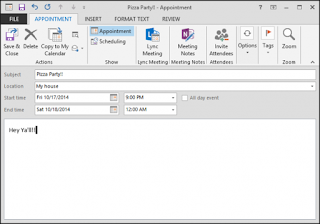
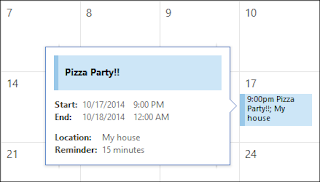
Let’s look at setting up appointments and meetings. In the following example, we’re organizing a pizza party. The subject of course, is the nature of the appointment, and while a pizza party isn’t necessarily an “appointment,” you get the idea. You can then add other specifics such as where the pizza party is taking place, and its start and end times.


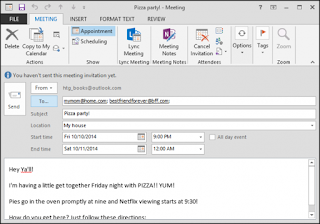
There’s a lot of space (technically unlimited) to add notes, instructions, or directions to the event. Of course, it’s not much of a party if you don’t have other people there. So we’ll need to invite some attendees. Once you invite people, it’s no longer considered an appointment. Instead, Outlook changes it to a meeting. In the following screenshot, we see our new appointment turned meeting.

You can type in names by hand, or click the “To” button to add attendees from your address book. If you haven’t set up an address book yet, we can tell you how to add and manage contacts as well as import contacts from other sources, like Gmail.


You can cut straight to the chase and simply click “New Meeting” from the Ribbon’s Home tab. When you’re inviting attendees, you have the option of requesting further Response Options.


If you request a response (rather than simply putting the word out and leaving it at that), then invitees will have a chance to RSVP. Note, this works wonderfully with a Microsoft product such as an Outlook.com e-mail account, where you’re given response options directly in the message.


In Gmail, you’ll be able to act on an invite in pretty much the same way. However you respond, it will be sent to the event organizer and automatically added to their Outlook.


Now that we’re clear on appointments and meetings, we’ll move on to modifying and canceling them because change is inevitable, and sometimes our best laid plans fall through.

Modifying or Canceling Meetings and Tracking Responses

Something has come up, and we need to move our pizza party to Saturday night. This is no problem for us but what about our attendees? Well, their plans are entirely up to them, but Outlook at least makes it easy to alert them to changes.

To modify a meeting and alert your attendees, first open the event from your Outlook calendar and make the changes you need. In this case, we’re just moving the meeting back one day. Note, that you can click “Send Update” and your invitees will be updated on the change.


At this point, if any attendees had previously accepted your invitation, they will need to re-accept it.

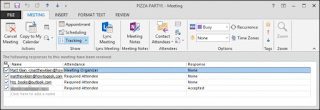
Now might be a good time to show how to track your meeting’s progress. Click the “Tracking” button and from here you can see your meeting’s progress. Right now, only one invitee has accepted so maybe this Saturday isn’t such a good time.


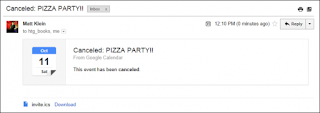
Uh oh, again something has just come up and we need to cancel the meeting. Simply click the “Cancel Meeting” button. Your invite will now change and you will get a “Send Cancelation” button to click and send out the bad news.


It’s as easy as that, your previous invitees will receive an updated email and the event will be removed from your Outlook calendar.

Events

With your appointments-turned-meetings entered and saved, you’ll see it on your calendar. When you hover over it, you’ll see the pertinent details. At this point, if everything is good, you can leave it and move on to other things.


If, however, you want to change or delete it, you can open it by either double-clicking it or using the appropriate action on the Ribbon, which here is the “Open” button.


You can also access many of the same ribbon controls from the right-click context menu.


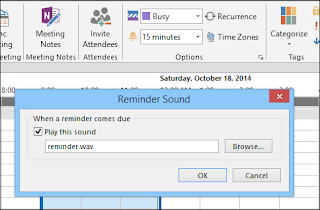
With your meeting or appointment open, note the Options tab, which will let you affect some changes such as changing your status (Busy, Tentative, Out of Office, etc.), set a reminder, change the time zone, and finally set the event as a recurring one.


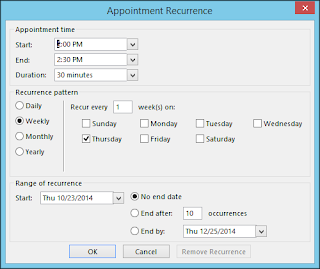
Recurring events are common, such as a weekly meeting or quarterly earnings event, or just lunch with a friend, so it’s good to know how to set them. As you can see from the screenshot, this should be pretty easy to work out. You can set the time of the appointment, the pattern, and of course the range or how long the recurrence will occur.


You see in the following image, we’ve set up a recurring event for every Monday at 1:00pm, which will continue indefinitely.


It’s important to remember that while meetings and appointments do have several key differences, they still look and can be modified the same way, so all the options you see for appointments will be the same for meetings.

Attaching a File or Document to a Calendar item

Let’s imagine you’ve made an appointment, such as to take your pet to the vet, or to get your oil changed, and in either case, you have a document or image you want to attach to it so you don’t forget.

In the following example, we’re getting our oil changed finally, and we’ve got a coupon for it. You could print out the coupon and try to remember it beforehand, or you could simply attach it to the appointment so when Outlook reminds you, the coupon is right there so you can print it while you’re thinking about it.


In order to do this, you want to click the “Attach File” and then browse to the location where it is saved. You can either insert the file as is, paste it inline as text, or insert the location of the file as a hyperlink. In this instance, we’re just going to attach the PDF as is.


Of course, this is going to be a highly useful feature if you need to share documents for a business meeting, send out study materials to students, or whenever the situation might call for supplementary information.

Managing and Sharing Calendars

Managing calendars will let you accomplish two things. You can open calendars from various sources, and you can create and save calendar groups.


If you click the “Open Calendar” button, you can create a calendar from several sources including from the Internet, or you can create a blank calendar. One advantage of creating a blank calendar is that you’re able to keep your work and home life separate.


In the following screenshot, you see several calendars have been created, and we’ve also created a special group for work. You can actually drag events from one calendar to another; you see how we have an entry for a weekly meeting in the two calendar we’ve selected to show.


Being able to drag events across calendars means that if you’ve spent time adding an appointment or meeting, if you later decide it needs to be on a different calendar, you don’t need to recreate the events.

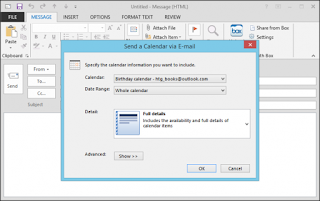
Finally, you can share calendars, which should be pretty self-explanatory, of note though is the ability to e-mail a calendar. We covered this briefly in a previous article, this is simply another way to accomplish it. Here in the following screenshot, you see what happens when you use this option.


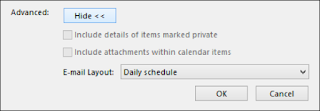
You can specify which calendar you share, the date range (from a single day to the whole calendar), level of details to share (simple availability, limited, and full details), and then there’s a few Advanced options you can use.


Sharing in this way means that you can quickly, easily, and seamlessly disseminate your calendar information with other Outlook users, as well as integrate calendars sent to you.

Calendar Options

There’s quite a few calendar options to sort through (though not quite as many as with e-mail). Most of these options are intended to configure the calendar to work more effectively with your professional and personal needs.


For example, you can change your work hours and work week, add holidays, change the time zone, set the default color, and even choose between Fahrenheit and Celsius. Work your way through them at your leisure and try out what works best for you.

The calendar features in Outlook are top-notch and if you work in an organization with a central Exchange server, then you’re likely familiar with how you can collaborate on shared calendars, see events, and more. All of this seamlessly works within your own local Outlook installation for added power and convenience.

At home, it’s nice to have a calendar with so many features in the same program. There’s no need to switch from an e-mail app to your calendar app, you can schedule events and quickly invite participants with just a few clicks of the mouse button, and much more.

What to Know When You Hire a Virtual Assistant:

Your business is growing, and you are busier now more than ever. You could use an extra set of hands, so someone suggested that you should use a virtual assistant. However, you have no idea what a virtual assistant is or for that matter, how they can help you. If that is the case, small business owner, it is time for you to become virtual and hire a virtual assistant.


What is a Virtual Assistant?

A virtual assistant is a highly skilled professional who offers business support services virtually. This can consist of an individual or a team of virtual assistants with virtually meaning they are located off site and work remotely. They are independent contractors and entrepreneurs who specialize in providing an array of services such as administrative, creative, technical, and legal support.

So if you’re still on the edge and not sure if you should allocate payroll funds for a virtual assistant, let’s go through some of its benefits.

Benefits of a Virtual Assistant
  • Valuable Skill Set – Virtual assistants are highly skilled independent contractors, including administrative assistants, website administrators, and senior level executives, all of whom have had a broad range of experience. Most virtual assistants work in a specific niche, meaning they’ll understand your industry better than someone who doesn’t focus on a particular niche.
  • Saving on Hiring a Full-Time Employee – A key benefit to using a virtual assistant for your business is the saving aspect. By working with a virtual assistant, you will save on the expense of hiring a full-time employee. This includes the amount of time and money spent on interviewing and training a new employee. This also includes the cost of employee benefits such as health insurance, employee-related benefits, and tax savings. As independent contractors, virtual assistants are responsible for their own bookkeeping and taxes. You will not have to worry about incurring such costs.
  • Save on Office Space – Since the contractor is virtual, they work off site. This allows you to save on expenses such as ordering a new desk and purchasing a computer. As a matter of fact, they use their own resources. So you save on the space that a new employee would incur. This is a win particularly if you happen to work remotely or independently yourself. You can work remotely and at the same time have the additional assistance you need.
  • Only Pay for Time Spent on Projects – This is a great benefit for your business budget. When you utilize a virtual assistant, you only pay for time spent on projects. So you can budget for the projects that have a high priority for your business. For example, Creative Business Assistants offers discounted monthly packages, which provides savings to their clients. Their clients know consistently what they will be billed for on a monthly basis or what they can allot for based on a project.
Virtual Assistant Tasks And Jobs

Now that you have a clear understanding of a virtual assistant, let’s talk specifically about some tasks that a virtual assistant can provide to your business.
  • Administrative Services – Most businesses need a good administrative assistant. A virtual assistant can handle all types of administrative services, which include managing company email, scheduling and confirming appointments, managing business correspondence, entering data, and assisting with bookkeeping. They can also take on additional administrative projects that you don’t wish to handle. Thankfully, you will find that many virtual assistants are Microsoft Excel experts.
  • Social Media Assistant – Handling social media for businesses can become time consuming for business owners and other staff. This is time that can be spent on other revenue-generating tasks. However, because of its importance in a business’s marketing plan, it can be delegated to a virtual assistant. According to Chris Ducker, every business should have a social media plan. And this is an area where a virtual assistant can help out. A virtual assistant can plan and schedule your social media marketing on your Facebook business page, Twitter, LinkedIn, and Google pages as well as on any other social media site that you use. They can research content, monitor and engage the users, and assist in building your network. This is a great task to outsource to a virtual assistant, as most business spend anywhere from five to 20 plus hours per week on social media.
  • Web Site Designer/Administrator – You will find a pool of virtual assistants who specialize in website design and management. You will find a lot of virtual assistants in this arena who are experts in web creation using software such as WordPress and others like it. Specifically, you can easily find virtual assistants who promote WordPress as their niche. If your company needs assistance with its website, which includes a blog, using this type of virtual assistant would be great for your business.
  • Marketing Assistant – Similar to the function of a social media assistant, a virtual assistant is a great tool for marketing. This would include assisting with launching any marketing campaigns and tracking their success. A virtual assistant can be used to assist implementing your marketing plan by helping with email campaigns. They can assist you with this by first scraping your email list to ensure that all the addresses are updated and do not include any errors. This can include helping you segment your lists as well source them. Secondly, they can help you implement and track the analytics of the email campaign itself. Another great way to use a virtual assistant in marketing is to have them promote any blogs that you may have. This is a much needed aspect for any business that has a blog. It must be promoted, updated, and managed. So all these tasks are great to delegate to your virtual assistant.
  • Customer Service Representative – For a busy entrepreneur, customer service is a great task to outsource to a virtual assistant. You can forward calls to your virtual assistant, and they can become a virtual call center designated specifically for your business. With the enhancement of technology, there are companies such as RingCentral that make this an easy option for small businesses. Additionally, the virtual assistant can handle any follow-up calls as needed.

How to Hire a Virtual Assistant

Now that you have a feel for what a virtual assistant is and the benefits of using one, how do you go about hiring one?
First, there are great resources out there that can assist you with finding a good virtual match for your business. Two good sites that specialize in matching virtual assistants are Elance and oDesk. There are also organizations that provide helpful information and house directories of virtual assistants by skill such as the International Virtual Assistant Association.

Second, once you have a list of candidates, you should start by interviewing them. Decide first what tasks you would like to delegate to them, and decide what skill set you would like them to have.

Third, once the selection is made and you contract with the virtual assistant, you will have to come to an agreement of terms. This should include the fee, billing, and payment terms that you have agreed to pay the virtual assistant, the work that has to be completed, cancellation terms and procedures, and processes for sharing of information. Once you have agreed on the terms, some type of agreement should be drafted and signed by both parties. This is done to protect both the business and the virtual assistant.

Lastly, virtual assistants can be a great resource for all phases of your business ownership. In some cases, businesses contract with virtual assistants for short term projects. In other cases, businesses have chosen to have a virtual assistant on standby or provide ongoing services over the life of the business. Whatever your particular need is, a virtual assistant can be a great benefit to your business.

Do These 3 Things Before Hiring a Virtual Assistant:

She called in sick her first day, was late on her second, and by the third she had to be fired. Not exactly what I expected after hearing all the wonderful things about working with virtual assistants (VAs).

Authors such as Tim Ferriss (The 4-Hour Workweek) and Chris Ducker (Virtual Freedom) proclaim great things about working with overseas virtual assistants, and they are not wrong. Virtual assistants can help you get more done because they work on the administrative tasks on your to-do list while you work on the high-value tasks that only you can do. (See my previous article, "Want to Make $1,000 or More Per Hour?")

But success with a virtual assistant doesn’t come naturally. Like any skill, it must be learned, developed and mastered. Over the past two years, I’ve hired several virtual assistants and had both good and bad experiences, including finding Dave, my rockstar VA who has become one of the most valuable team members at BiggerPockets.

Related: 3 Tips for Getting the Most Out of Your Virtual Assistant


Finding rockstar VAs to help you get more done is not rocket science. Hopefully, these three tips will help you find the perfect assistant for your team.

1. Don’t hire a VA until you are ready.

One of the first things I realized when I hired that first "disaster VA" was that I wasn’t ready for an assistant. I didn’t know exactly what that assistant would do, I just assumed they would jump in and start helping. I also had very little time to train that assistant, so in the end, there was nothing for them to do.

Before hiring your first assistant, be sure to have a clear idea of what tasks they might be able to take over from you. I now use Evernote to keep track of every repetitious task I do each day, week or month so I can decide later what can be outsourced. When I get enough stuff on that list, I’ll hire an assistant to help manage those tasks.

2. Create solid systems first.

I’ve found the greatest success when I’ve created a system, mastered that system myself, created a training program for that system and then handed it off. If you’ve read The E Myth by Michael Gerber, you’ll know exactly what I’m talking about.

For example, each week I record an episode of The BiggerPockets Podcast and need to have it edited. At first, I did all my editing myself, but once I mastered that entire process, I made a training video showing exactly how I edit the podcast. I then turned that video into a written training manual.

Related: 3 Mistakes to Avoid When Working With a Virtual Assistant

I handed the system off to my assistant Dave and trained him on exactly how to do it. Dave now edits every podcast, and I don't even need to review them to ensure they are right. They always are.

If Dave decided to leave at some point (don’t do it, Dave!), I could easily hire another assistant for that same role and use the existing training material, resulting in a much less stressful turnover.

3. Hire like your company depends on it.

Most virtual assistants are going to be terrible. It’s not because they are virtual assistants, though. It’s because they are human.

If you’ve ever had to hire employees before, you’ve probably discovered that less than 10 percent of applicants are worth hiring. Most are simply not going to cut it. So why do we expect virtual assistants to be any better?

You wouldn’t hire a lead developer for your company after a five-minute Skype interview, so why would you hire a VA with that process? Sure, the developer might cost significantly more, but in reality, the assistant is more important to the future of your company. No, you didn’t read that wrong. An assistant should be your number-one most important hire because they are freeing up your time, which is worth far more than the developer or whoever else you might be hiring.

So treat your virtual assistant role like it’s the most important role in your company -- because it just might be.

A virtual assistant can change your life, giving you back your day so you can work on the tasks that will take your business to incredible new places. However, if you think you can simply hire any ol' virtual assistant and improve your business, you are naive. Instead, get prepared, take the role seriously, build solid systems, create in-depth training and hire only the best.

Why do you need email etiquette?

A company needs to implement etiquette rules for the following three reasons:
  • Professionalism: by using proper email language your company will convey a professional image.
  • Efficiency: emails that get to the point are much more effective than poorly worded emails.
  • Protection from liability: employee awareness of email risks will protect your company from costly law suits.


What are the etiquette rules?

There are many etiquette guides and many different etiquette rules. Some rules will differ according to the nature of your business and the corporate culture. Below we list what we consider as the 32 most important email etiquette rules that apply to nearly all companies. (Note: Items 1-32 are all from source 1).

1. Be concise and to the point.

Do not make an e-mail longer than it needs to be. Remember that reading an e-mail is harder than reading printed communications and a long e-mail can be very discouraging to read.

2. Answer all questions, and pre-empt further questions.

An email reply must answer all questions, and pre-empt further questions – If you do not answer all the questions in the original email, you will receive further e-mails regarding the unanswered questions, which will not only waste your time and your customer’s time but also cause considerable frustration. Moreover, if you are able to pre-empt relevant questions, your customer will be grateful and impressed with your efficient and thoughtful customer service. Imagine for instance that a customer sends you an email asking which credit cards you accept. Instead of just listing the credit card types, you can guess that their next question will be about how they can order, so you also include some order information and a URL to your order page. Customers will definitely appreciate this.

3. Use proper spelling, grammar & punctuation.

This is not only important because improper spelling, grammar and punctuation give a bad impression of your company, it is also important for conveying the message properly. E-mails with no full stops or commas are difficult to read and can sometimes even change the meaning of the text. And, if your program has a spell checking option, why not use it? [Note: avoid using common IM acronyms unless you are writing to a close friend – many in the older generation will be clueless as to what you are trying to say].

4. Make it personal.

Not only should the e-mail be personally addressed, it should also include personal i.e. customized content. For this reason auto replies are usually not very effective. However, templates can be used effectively in this way, see next tip.

5. Use templates for frequently used responses.

Some questions you get over and over again, such as directions to your office or how to subscribe to your newsletter. Save these texts as response templates and paste these into your message when you need them. You can save your templates in a Word document, or use pre-formatted emails. Even better is a tool such as ReplyMate for Outlook (allows you to use 10 templates for free).

6. Answer swiftly.

Customers send an e-mail because they wish to receive a quick response. If they did not want a quick response they would send a letter or a fax. Therefore, each e-mail should be replied to within at least 24 hours, and preferably within the same working day. If the email is complicated, just send an email back saying that you have received it and that you will get back to them. This will put the customer's mind at rest and usually customers will then be very patient!

7. Do not attach unnecessary files.

By sending large attachments you can annoy customers and even bring down their e-mail system. Wherever possible try to compress attachments and only send attachments when they are productive. Moreover, you need to have a good virus scanner in place since your customers will not be very happy if you send them documents full of viruses!

8. Use proper structure & layout.

Since reading from a screen is more difficult than reading from paper, the structure and lay out is very important for e-mail messages. Use short paragraphs and blank lines between each paragraph. When making points, number them or mark each point as separate to keep the overview.

9. Do not overuse the high priority option.

We all know the story of the boy who cried wolf. If you overuse the high priority option, it will lose its function when you really need it. Moreover, even if a mail has high priority, your message will come across as slightly aggressive if you flag it as 'high priority'.

10. Do not write in CAPITALS.

IF YOU WRITE IN CAPITALS IT SEEMS AS IF YOU ARE SHOUTING. This can be highly annoying and might trigger an unwanted response in the form of a flame mail. Therefore, try not to send any email text in capitals. [Likewise, do not eliminate all capital letters unless you’re e.e. cummings].

11. Don't leave out the message thread.

When you reply to an email, you must include the original mail in your reply, in other words click 'Reply', instead of 'New Mail'. Some people say that you must remove the previous message since this has already been sent and is therefore unnecessary. However, I could not agree less. If you receive many emails you obviously cannot remember each individual email. This means that a 'threadless email' will not provide enough information and you will have to spend a frustratingly long time to find out the context of the email in order to deal with it. Leaving the thread might take a fraction longer in download time, but it will save the recipient much more time and frustration in looking for the related emails in their inbox!

12. Add disclaimers to your emails.

It is important to add disclaimers to your internal and external mails, since this can help protect your company from liability. Consider the following scenario: an employee accidentally forwards a virus to a customer by email. The customer decides to sue your company for damages. If you add a disclaimer at the bottom of every external mail, saying that the recipient must check each email for viruses and that it cannot be held liable for any transmitted viruses, this will surely be of help to you in court (read more about email disclaimers). Another example: an employee sues the company for allowing a racist email to circulate the office. If your company has an email policy in place and adds an email disclaimer to every mail that states that employees are expressly required not to make defamatory statements, you have a good case of proving that the company did everything it could to prevent offensive emails.

13. Read the email before you send it.

A lot of people don't bother to read an email before they send it out, as can be seen from the many spelling and grammar mistakes contained in emails. Apart from this, reading your email through the eyes of the recipient will help you send a more effective message and avoid misunderstandings and inappropriate comments.

14. Do not overuse Reply to All.

Only use Reply to All if you really need your message to be seen by each person who received the original message.

15. Mailings > use the Bcc: field or do a mail merge.

When sending an email mailing, some people place all the email addresses in the To: field. There are two drawbacks to this practice: (1) the recipient knows that you have sent the same message to a large number of recipients, and (2) you are publicizing someone else's email address without their permission. One way to get round this is to place all addresses in the Bcc: field. However, the recipient will only see the address from the To: field in their email, so if this was empty, the To: field will be blank and this might look like spamming. You could include the mailing list email address in the To: field, or even better, if you have Microsoft Outlook and Word you can do a mail merge and create one message for each recipient. A mail merge also allows you to use fields in the message so that you can for instance address each recipient personally. For more information on how to do a Word mail merge, consult the Help in Word.

16. Take care with abbreviations and emoticons.

In business emails, try not to use abbreviations such as BTW (by the way) and LOL (laugh out loud). The recipient might not be aware of the meanings of the abbreviations and in business emails these are generally not appropriate. The same goes for emoticons, such as the smiley :-). If you are not sure whether your recipient knows what it means, it is better not to use it.

17. Be careful with formatting.

Remember that when you use formatting in your emails, the sender might not be able to view formatting, or might see different fonts than you had intended. When using colors, use a color that is easy to read on the background.

18. Take care with rich text and HTML messages.

Be aware that when you send an email in rich text or HTML format, the sender might only be able to receive plain text emails. If this is the case, the recipient will receive your message as a .txt attachment. Most email clients however, including Microsoft Outlook, are able to receive HTML and rich text messages.

19. Do not forward chain letters.

Do not forward chain letters. We can safely say that all of them are hoaxes. Just delete the letters as soon as you receive them.

20. Do not request delivery and read receipts.

This will almost always annoy your recipient before he or she has even read your message. Besides, it usually does not work anyway since the recipient could have blocked that function, or his/her software might not support it, so what is the use of using it? If you want to know whether an email was received it is better to ask the recipient to let you know if it was received.

21. Do not ask to recall a message.

Biggest chances are that your message has already been delivered and read. A recall request would look very silly in that case wouldn't it? It is better just to send an email to say that you have made a mistake. This will look much more honest than trying to recall a message.

22. Do not copy a message or attachment without permission.

Do not copy a message or attachment belonging to another user without permission of the originator. If you do not ask permission first, you might be infringing on copyright laws.

23. Do not use email to discuss confidential information.

Sending an email is like sending a postcard. If you don't want your email to be displayed on a bulletin board, don't send it. Moreover, never make any libelous, sexist or racially discriminating comments in emails, even if they are meant to be a joke.

24. Use a meaningful subject line.

Try to use a subject that is meaningful to the recipient as well as yourself. For instance, when you send an email to a company requesting information about a product, it is better to mention the actual name of the product, e.g. 'Product A information' than to just say 'product information' or the company's name in the subject.

25. Use active instead of passive.

Try to use the active voice of a verb wherever possible. For instance, 'We will process your order today', sounds better than 'Your order will be processed today'. The first sounds more personal, whereas the latter, especially when used frequently, sounds unnecessarily formal.

26. Avoid using URGENT and IMPORTANT.

Even more so than the high-priority option, you must at all times try to avoid these types of words in an email or subject line. Only use this if it is a really, really urgent or important message.

27. Avoid long sentences.

Try to keep your sentences to a maximum of 15-20 words. Email is meant to be a quick medium and requires a different kind of writing than letters. Also take care not to send emails that are too long. If a person receives an email that looks like a dissertation, chances are that they will not even attempt to read it!

28. Don't send or forward emails containing libelous, defamatory, offensive, racist or obscene remarks.

By sending or even just forwarding one libelous, or offensive remark in an email, you and your company can face court cases resulting in multi-million dollar penalties.

29. Don't forward virus hoaxes and chain letters.

If you receive an email message warning you of a new unstoppable virus that will immediately delete everything from your computer, this is most probably a hoax. By forwarding hoaxes you use valuable bandwidth and sometimes virus hoaxes contain viruses themselves, by attaching a so-called file that will stop the dangerous virus. The same goes for chain letters that promise incredible riches or ask your help for a charitable cause. Even if the content seems to be bona fide, the senders are usually not. Since it is impossible to find out whether a chain letter is real or not, the best place for it is the recycle bin.

30. Keep your language gender neutral.

In this day and age, avoid using sexist language such as: 'The user should add a signature by configuring his email program'. Apart from using he/she, you can also use the neutral gender: ''The user should add a signature by configuring the email program'.

31. Don't reply to spam.

By replying to spam or by unsubscribing, you are confirming that your email address is 'live'. Confirming this will only generate even more spam. Therefore, just hit the delete button or use email software to remove spam automatically.

32. Use cc: field sparingly.

Try not to use the cc: field unless the recipient in the cc: field knows why they are receiving a copy of the message. Using the cc: field can be confusing since the recipients might not know who is supposed to act on the message. Also, when responding to a cc: message, should you include the other recipient in the cc: field as well? This will depend on the situation. In general, do not include the person in the cc: field unless you have a particular reason for wanting this person to see your response. Again, make sure that this person will know why they are receiving a copy.

33. Remember that email is not always the best form of communication.

There are many subjects that are too sensitive to discuss over email mainly because misinterpretation could have serious consequences. Some topics that should generally be resolved outside of email are:
Disciplinary action
Conflicts about grades or personal information
Concerns about fellow classmates/workmates
Complaints

When it appears that a dialogue has turned into a conflict, it is best to suggest an end to the swapping of email and for you to talk or meet in person. If you receive a flaming email try to respond in a short and simple response. If that does not appease the flamer than make contact with him or her outside the virtual realm.

33. For your personal accounts, use a user ID that comes across as professional.

A potential employer who is trying to contact you regarding a position will not be impressed if they are sending their email to thicnspicy@hotmail.com or amishburrito@aol.com. Choose a user name that would not be offensive or childish to a potential employer.

And finally, two very important items to remember:

34. Never send an email when you are angry.

Don't send an angry or sarcastic message without first giving yourself a few hours or overnight to make sure you really want to send it. Remember that an email can be forwarded to your boss or others or used as evidence in court!

This is closely followed by:

35. Remember that email is a public document.

Stop right where you are and set aside a couple of brain cells for the following statement: there is no such thing as a private e-mail. The reason? Keep reading.

With some e-mail systems, the e-mail administrator has the ability to read any and all e-mail messages. If this is the case where you are located, you better hope that there is an honest and respectable person in that position.

Some companies monitor employee e-mail (as well as internet usage). The reasons for this obtrusive behavior range from company management wanting to make sure users are not wasting time on frivolous messages to making sure that company secrets are not being leaked to unauthorized sources.

E-mail software is like all software in that occasionally things go wrong. If this happens, you may end up receiving e-mail meant for another person or your e-mail may get sent to the wrong person. Either way, what you thought was private is not private anymore.

So where does this leave us. First: there is no such thing as a private e-mail. Got it? Second, don't send anything by e-mail that you would not want posted on the company bulletin board. If it's safe enough for the bulletin board, it's safe enough for e-mail. Finally, if you are debating whether or not to send something personal by e-mail, either deliver it by hand or send it by snail mail.

Voice Mail Etiquette

Voice mail is this decade's answering machine. It is an efficient way to communicate valuable information. Statistics show that only 70% of phone calls are ever completed on the first try, therefore voice mail is an important communication tool. Here are eight tips to ensure that your voice mail messages are effective and do not create professional problems for you.

  • Yes, it’s basic, but…don’t forget to give your name and phone number.
  • Keep messages short and to the point.
  • Never leave a harsh or negative message on voice mail. This can lead to major problems. Unlike a conversation the receiver can redirect it to other people.
  • Don't record anything that can be misinterpreted or is confidential.
  • If you find yourself reading a prepared memo or announcement over the phone stop. It is better to just send the memo out.
  • Always be prepared to leave a message. Statistics show that 70% of the time the individual you wish to speak with will not be available.
  • Avoid flippant messages, even in jest.
  • Remember to check your voice mail at least twice a day, especially if you receive time sensitive messages.
  • Don't leave messages from noisy restaurants, parties are bars, background noise can be heard clearly.

Monday 1 August 2016

Using Outlook 2013 Rules to Filter Messages and Spam


Many of the message management functions available in Outlook can be easily accomplished with the use of rules. Rules can perform a variety of actions on a message, e.g., changing the importance level, automatic filing into other mail folders or even automatic deletion.

Getting Started

You first need to determine something unique about the messages from the list or sender that will allow the messages to be filtered out, while leaving the rest of your mail intact. This might be something in the subject, a unique sender, something in the body of the message, or a customized header.

Note on deleting messages: Even the most thoroughly thought-out filter can fail due to any number of unforeseen variables. We do not recommend creating a filter to automatically delete messages.


Transferring to a Mail Folder Based on Subject

A few months ago, you subscribed to the mailing list "Earth-Info." At first the list wasn't getting a lot of traffic, but now it is. You still want to read the messages but want them in a separate folder from you inbox. You first need to determine something unique about the messages from this list that will allow them to be filtered out while leaving the rest of your mail intact. This mailing list includes the text "[earth-info]" in the subject like of every message. 
  1. Select File | Manage Rules & Alerts. 
  2. Click on the New Rule button. 
  3. Locate the "Step 1: Select a template" box. 
  4. Under the section labeled "Start from a blank rule", select Apply rule on messages I receive. 
  5. Click Next. 
  6. In the "Which condition(s) do you want to check?" box,check the box with specific words in the subject. 
  7. In the "Edit the Rule Description" box below, click on specific words. 
  8. In the "Specify words or phrases to search for in this subject" window, type the text to sear for. In this example, you would type [earth-info]. 
  9. Click the Add button. Click OK. Click Next. 
  10. Check the box to the left of the action you wish to perform on this message. In this example, you would check the box to the left of move it to a specified folder. 
  11. In the "Edit the Rule Description" box below, click on specified. 
  12. In the "Choose a folder" dialog box, select an already existing folder or create a new one. 
  13. Click Next at the "Are there any exceptions?" box. 
  14. Specify a name for this filter. It does not matter what you call it. This is just so you can tell it apart from other filters you may create. Make certain that the box to the left of Turn on this rule is checked. 
  15. Click Finish | OK.
Filtering Based on Customized Headers

A mailing list you are subscribed to has recently been hit by a sudden surge of email postings. Unfortunately, the list doesn't appear to include any way of distinguishing the messages from other mail. The subject isn't modified, the "From" field always appears as the original sender rather than the list, and the "To" field is always your own email address.
Viewing the full headers of the message reveals something, however. (To view all of the headers, select View | Options... while reading the message.) The messages from this mailing list includes the header:

X-List-Remailer: i-list@heron.com

The following example moves all email messages that contain the above header into a mail folder called "FilteredMessages". 

  1. Select File | Mange Rules & Alerts. 
  2. Click on the New Rule button. 
  3. Locate the "Step 1: Select a template" box. 
  4. Under the "Start from a blank rule" section, select Apply rules on messages I receive. 
  5. Click Next. 
  6. In the "Which condition(s) do you want to check?" box, select with specific words in the message header. 
  7. In the "Edit the Rule Description" box below, click on specific words. 
  8. In the "Specify words or phrases to search for in the subject" window, type the exact match for the header you wish to filter. In this example, you would type: X-List-Remailer:                       i-list@heron.com
  9. Click Add | OK | Next. 
  10. Check the box to the left of the action you wish to perform upon this message. In this example, select move it to the specified folder, located in the "What do you want to do with the message?" box. 
  11. In the "Edit the Rule Description" box, below, click on specified. 
  12. In the "Choose a folder" box, select an already existing folder or create a new one. For this example, select Mailbox-yourname and click New. 
  13. In the Name field, type FilteredMessages 
  14. Click OK. 
  15. Click OK again. 
  16. Click Next. 
  17. Click Next again at the "Are there any exceptions?" box. 
  18. Make certail that the box to the left of Turn on this rule is checked. 
  19. Click Finish | OK. 
Source


How To Set Up Email Filters In Gmail, Hotmail and Yahoo

Setting up email filters or organizing your emails into folders is an efficient way to manage your emails. You might want to know how to set up email filters to automatically sort your email into folders for better management.


For example, you may want to have a Facebook filter to separate all your notifications emails from your everyday emails. You could also do this for newsletters that you are subscribed to, emails from family members, or emails related to work. It’s also a great tool to automatically trash or mark certain emails as spam. As you can see, there are a lot of advantages for filtering your emails.

So how do you set them up? Well, I am going to show you how to set up email filters in Gmail, Hotmail, and Yahoo, and point you in the right direction on how to set them up in Thunderbird and Outlook.

Creating Filters in Gmail

The first thing to point out is that Gmail does not use the tradition “˜folder’ structure. Gmail uses “˜labels’, but they are pretty much the same thing, it just has a different name.

To setup an email filter, click on Settings which is in the top right corner, then click on Filters. If you already have filters setup, they will be displayed. As you can see, my first filter sends all my emails apart from Facebook emails to another email account so I can access them on my mobile phone.

The second filter deletes all my Buzz notifications, or anything with Buzz in the subject.


So to create a filter, simply click on Create a new filter.

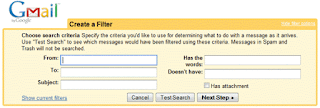
You will then be prompted to provide criteria to base the filter on. From the image below, you can base the filter on the following search criteria:

From: Who the email is from. This can be an email address or a phrase in the email address such as makeuseof. If you include makeuseof in the From box, all emails that are from a MakeUseOf email address will be applied to the filter.

· To: You may have email forwarding or POP access set up on your Gmail account so all your work emails get sent to your personal Gmail account. Therefore, if you want to separate your work emails from personal emails, enter your work email address in the To box. All emails you receive that are sent to the email address you specify, the filter will apply.

· Subject: If you enter a phrase in the Subject, any emails with that phrase in the subject would be apply.

· Has the words: If the contents of the email has the words you specify, the filter will apply.

· Doesn’t have: All emails that do not contain the following phrase you specify, the filter will apply.

· Has attachment: All emails with a file attached.


Depending on what you want to filter depends on what you enter. In this example, I am going to create a filter to to move all my Facebook emails in to a folder/label. To do this, I am going to enter Facebook into the From box. The reason why I am using Facebook and not facebook.com is because not all emails are from thefacebook.com domain name, some are from facebookmail.com. So by just typing in Facebook, I will capture all emails from Facebook, including emails from another domain name that has the phrase Facebook in it.
If you want, you can test the search to ensure it works by clicking on Test Search. If you are happy with the results, click Next Step.

Now I am going to tell Gmail what to do with the emails it filters. I am going to select Apply the label: Facebook because I want all my Facebook emails to go into a Facebook label. If you don’t have a Facebook label, make sure you create it when you select the label in the drop down box. Make sure Apply the label is also checked.


Then all you have to do is click on Create Filter. If you want the filter to sort your current emails, make sure you tick the Also apply filter to xx conversations below checkbox.

Congratulations, you have successfully created your Gmail filter.

Create An Email Filter In Hotmail

Login to your Hotmail account. In the top right hand corner, click on Options, then select More Options. Under Customise your mail, select Automatically sort e-mail into folders, then click on New Filter.


Similar to Gmail, enter your filter criteria. In this example, I am going to have a filter that moves all my emails from MakeUseOf into a MakeUseOf Folder. By having@makeuseof.com, any emails received from a MakeUseOf email address will be moved into the MakeUseOf folder I created.

Once you are done with your filter, hit Save.
Setup An Email Filter in Yahoo

As like Hotmail, click on Options and More Options which is in the top right corner of the screen. On the left hand side, select Filters. To create your filter, on the top bar, select Add Filter. Everything should be self explanatory and very similar to Gmail and Hotmail.


As I contribute to MakeUseOf Answers regularly, I get a lot of email notification of replies. As you may be aware, the subject of the replies begins with[makeuseofanswers]. So I am going to setup a filter to move these emails into a MakeUseOf Answers folder. I won’t use the sender as a filter criteria because it won’t work. As the comment system uses Disqus, I don’t want to have comments from other blogs in my MakeUseOf Answers folder.

To apply the correct filter, in Subject section, I am going to select begins with in the drop down box and type [makeuseofanswers] as this will filter my email’s appropriately.
Other Clients

If you are using Thunderbird to manage your email’s, Tina has a great article on how you can setup filters.

If you use Microsoft Outlook, you may want to read this article and this article to organise your emails into folders.

So hopefully, you now have an understanding on how to organise your emails more efficiently. Remember, when creating a filter, you need to ensure that the emails you are filtering have a unique but common occurrence such as a specific email address, subject, or a phrase in the email contents. If it doesn’t, other emails may get caught in the filter which you don’t want to happen.